
Step 1: Install OpenLDAP on Ubuntu 18.04 LTS
Set your system hostname and add it to file /etc/hosts.
sudo hostnamectl set-hostname ldap.example.com
echo "192.168.18.50 ldap.example.com" | sudo tee -a /etc/hosts
Replace ldap.example.com with your correct hostname/valid domain name.
The OpenLDAP packages are available on Ubuntu 18.04 upstream repositories,
and you install them by just firing apt install commands.
sudo apt update
sudo apt -y install slapd ldap-utils
During the installation, you’ll be prompted to set LDAP admin password, provide your desired password, then press <OK>

Confirm the password and continue installation by selecting <ok> with TAB key.

You can confirm that your installation was successful using the commandslapcat to output SLAPD database contents.
root@openldap:~# slapcat
dn: dc=example,dc=com
objectClass: top
objectClass: dcObject
objectClass: organization
o: example.com
dc: example
structuralObjectClass: organization
entryUUID: e2990be6-689b-1038-8d53-cd4ea0a9f2fa
creatorsName: cn=admin,dc=example,dc=com
createTimestamp: 20181020100850Z
entryCSN: 20181020100850.169668Z#000000#000#000000
modifiersName: cn=admin,dc=example,dc=com
modifyTimestamp: 20181020100850Z

dn: cn=admin,dc=example,dc=com
objectClass: simpleSecurityObject
objectClass: organizationalRole
cn: admin
description: LDAP administrator
userPassword:: e1NTSEF9ekc4WjVhTSt1RnBrTk1hb1hjRUt4S0cvbk8vSkNUS0k=
structuralObjectClass: organizationalRole
entryUUID: e29b65e4-689b-1038-8d54-cd4ea0a9f2fa
creatorsName: cn=admin,dc=example,dc=com
createTimestamp: 20181020100850Z
entryCSN: 20181020100850.185122Z#000000#000#000000
modifiersName: cn=admin,dc=example,dc=com
modifyTimestamp: 20181020100850Z
Step 2: Add base dn for Users and Groups
The next step is adding a base DN for users and groups.
Create a file named basedn.ldif with below contents:
dn: ou=people,dc=example,dc=com
objectClass: organizationalUnit
ou: people

dn: ou=groups,dc=example,dc=com
objectClass: organizationalUnit
ou: groups
Replace example and com with your correct domain components.
Now add the file by running the command:
$ sudo ldapadd -x -D cn=admin,dc=example,dc=com -W -f basedn.ldifEnter LDAP Password:
adding new entry "ou=people,dc=example,dc=com"
adding new entry "ou=groups,dc=example,dc=com"Step 3: Install phpLDAPadmin on Ubuntu 18.04 LTS
Once we have OpenLDAP running, it is time to install phpLDAPadmin which will help you manage your LDAP server.
phpLDAPadmin requires PHP and Apache web server installed on your Ubuntu system.
sudo apt -y install apache2 php php-cgi libapache2-mod-php php-mbstring php-common php-pearEnable php7.2-cgi extension
sudo a2enconf php7.2-cgi
sudo  systemctl reload apache2
Install phpLDAPadmin by running the command:
sudo apt -y install phpldapadminModify access permissions on /etc/apache2/conf-enabled/phpldapadmin.conf to allow access only from your trusted subnets.
Order deny,allow
Deny from all
Allow from 127.0.0.1 192.168.18.0/24
You’ll need to restart apache web server after making the change:
sudo systemctl restart apache2If you have active UFW firewall, open port 80 and port 443
sudo ufw allow proto tcp from any to any port 80,443To access phpLDAPadmin, you’ve to access:
http://(server’s hostname or IP address)/phpldapadminUse a client machine allowed from the network to access the dashboard.

Click the “login” button at the top left corner to login to the admin dashboard.

- Login DN: cn=admin,dc=example,dc=com
- Password: Use the admin password configured earlier.
Step 4: Install LDAP Account Manager on Ubuntu 18.04 LTS – Recommended
I noticed phpLDAPadmin doesn’t work well with PHP 7.2 which is a default version of PHP on Ubuntu 18.04. I recommend you use LDAP Account Manager instead. Follow our guide below to install and configure LDAP Account Manager on Ubuntu 18.04.
How to install and configure LDAP Account Manager on Ubuntu 18.04 / Ubuntu 16.04 LTS.
The guide also shows you how to add user accounts and groups to your LDAP server.
Install LDAP Account Manager
LDAP Account Manager package is available on Ubuntu repositories, install it with the command:
sudo apt -y install ldap-account-managerWhen done with the install, it is recommended to restrict access to the web dashboard by allowing trusted local subnets only. This is optional though and you can skip it.
sudo vim /etc/apache2/conf-enabled/ldap-account-manager.confEdit line 12 to comment the line Require all granted and add subnet(s) allowed to access LDAP Account Manager administration interface.
#Require all granted
Require ip 127.0.0.1 192.168.10.0/24 192.168.18.0/24
Restart apache web server after making the change:
sudo systemctl restart apache2Step 3: Configure LDAP Account Manager
Access LDAP Account Manager web interface from a trusted machine network on
http://(server’s hostname or IP address)/lamThe LDAP Account Manager Login form will be shown. We need to set our LDAP server profile by clicking on[LAM configuration] at the upper right corner.
Then click on,Edit server profiles

This will ask you for LAM Profile name Password:

Default password is lam
The first thing to change is Profile Password, this is at the end of General Settings page.

Next is to set LDAP Server address and Tree suffix. Mine looks like below, you need to use your Domain components as set in server hostname.

Set Dashboard login by specifying the admin user account and domain components under “Security settings” section.

Switch to “Account types” page and set Active account types LDAP suffix and List attributes.
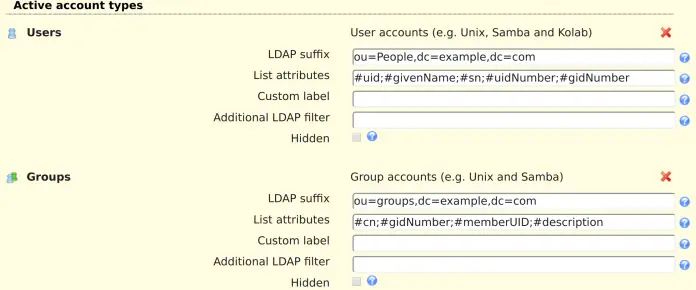
You can also enable other available account types you wish to use. User and Group modules can be enabled and disabled on “Modules” page.
When done with the settings, click the Save button at the bottom of the page.
Step 4: Add user accounts and groups with LDAP Account Manager
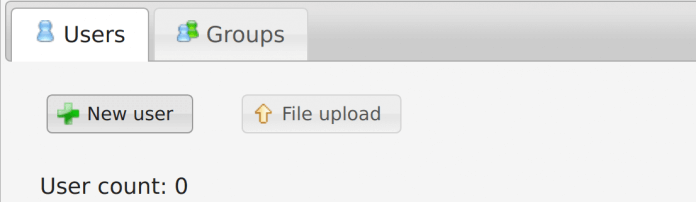
Login with the accountadmin to LAM dashboard to start managing user accounts and groups.

You’ll use the Users and Groups links to manage user accounts and groups.
Add User Group
You need to add a user group before the actual user account. Click on Groups > New Group
Give the group a name, optional group ID and description.

Do the same to add other groups.
Add User Accounts
Once you have the groups for user accounts to be added, click on Users > New user to add a new user account to your LDAP server. You have three sections for user management:
Personal – This contains user’s personal information like the first name, last name, email, phone, department, address e.t.c
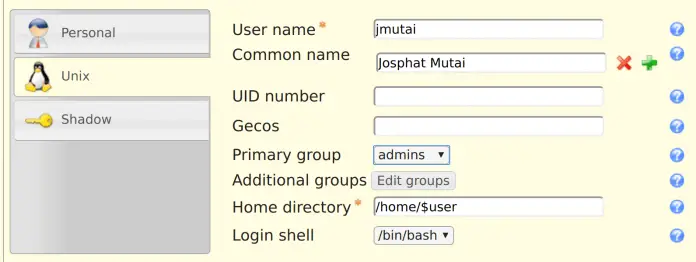
Unix: This section is where you set the Username, Common name, UID number(optional), User comment, User Primary group, and Secondary groups, Home directory and the default Login shell.

Shadow: This section is where you add Shadow account extension, things related to password aging/expiry.

You may have more sections depending on the Modules enabled for User and Group management.
Once user accounts are added, the last step is configuring your Linux servers and Applications to authenticate against your LDAP server. See our guide on How to configure Ubuntu 18.04 / Ubuntu 16.04 LTS as LDAP Client for this.
